Heb je daar nog een foto van? ik heb het nu een beetje provisorisch aangesloten.


")
Ik denk dat ik eerst de co moet afstellen. Ik heb echter geen idee hoe dat werkt.Je moet inderdaad wat experimenteren met de sproeiers. Je zou i.p.v. die 55 stationairsproeier een maatje groter of kleiner kunnen nemen, 50 of 65 dus.
Je moet ook de CO afstellen met de schroef die horizontaal onder in de basis van de carb zit, zie het plaatje op die Engelse site.
Ik heb de vlotter hoogte en slag gecontroleerd voordat ik hem heb ingebouwd en die was al conform de weber specificatie.Het bokken kan een gevolg zijn van een te laag vlotterkamerniveau.
ook ca 1400 maar hij bokt aanvankelijk te veel zodat ik voor mijn gevoel gas moet blijven bijgeven om hem mooi rond te laten lopen. Ik heb het gevoel dat er overigens lucht in de automatische choke inrichting zit.Hoeveel toeren draait de motor als je met choke start?
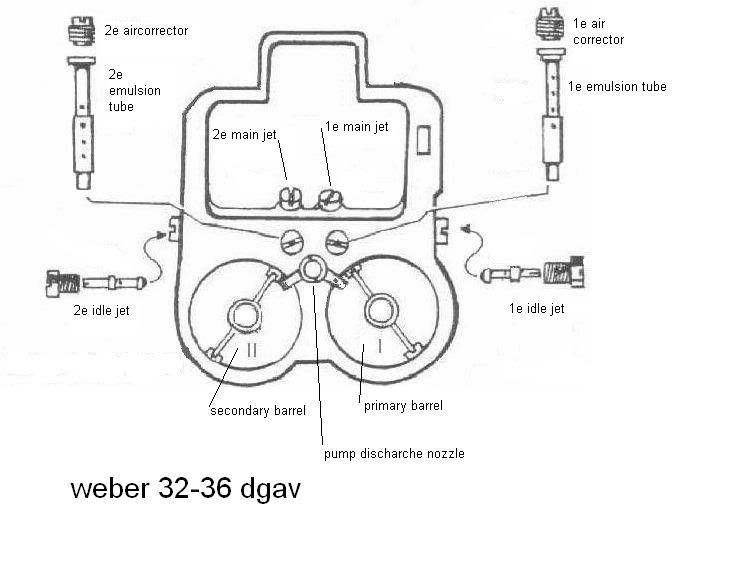
Zie http://www.carburetion.com/diags/3236DGAVDiaginfo.asp" onclick="window.open(this.href);return false; (schroef 58 )v4 hans schreef:...Ik denk dat ik eerst de co moet afstellen. Ik heb echter geen idee hoe dat werkt.


performance96 schreef:
Setting up a Weber Carb
1. Ensure you have the right jets installed!
2. Ensure the linkage is operating properly
3. Ensure the linkage and throttle nuts are not over-tight and seizing the movement
The Carb will have two adjustment screws:
1. Idle Speed Screw (70)- This is found close to the throttle linkage. It limits the amount the throttle can be closed.
2. Mixture Screw (58 )- This screw enters into the body of the carb. It should not be unscrewed more than 1 1/2 turns.
Trouble Shooting:
* Poor idle with the mixture screw less than 1 turn out = Go down on the Primary Idle Jet (33)
* Poor idle with the mixture screw more than 2 turns out = Go up on the Primary Idle Jet
Set Up Procedure
1. All settings are done with choke disengaged or warmed up so that the choke is fully opened and disengaged. For automatic choke carburetors this is done first by opening the choke butterfly by hand and inserting a wood block or wedge of some kind to hold open while the linkage is cycled (linkage operated through its full movement) to clear the choke cam. (You will hear a metallic click as the cam is released. You can check the fast Idle screw under the choke assembly to confirm that it is not in contact with the choke fast idle cam.)
2. Set the Idle stop screw (70) by backing out the idle speed screw until it is not in contact with the throttle stop lever.
Cycle the linkage again to be sure that the linkage comes to close without any assistance. (Checking for linkage bind.) Now bring screw back into contact with the lever and continue to open or screwing in 1 turn no more than 11/2 turns.
3 Set the mixture screw (58 ) by first screwing in until the screw stop (do not force the screw or it will damage the carburetor). Then back the screw 2 full turns.
4 Start the engine, the engine will run very slowly more like a tractor. As long as the engine stays running idle speed is not important at this point.
5 The first thing to do is not set up the idle speed, but to set the idle mixture screw to lean best idle setting. First, turn in the mixture screw until the engine dies or runs worse, then back out the screw (recommend turning ¼ to ½ turn at a time). The engine should pick up speed and begin to smooth out. Back out ½ turn more, or until the screw does nothing or runs worse then turn back to the point where it ran its best. Use your ear, not a scope or tuning instruments at this point. You want to tune the engine by sound. Adjust to best, fastest and smoothest running point.
6 Now that the mixture screw is at its best running location, you can adjust the idle speed the screw. The screw will be sensitive and should only take ¼ to ½ turns to achieve the idle speed you like.
7 Check and set idle to your driving preference. Put the car in gear and apply slight load, and set the Idle as you like it. Do not set it too high, as this will cause causes excessive clutch and brake wear. The Idle only needs to be 7 to 900 RPM with light load
8 Recheck timing and vacuum hook ups. Recheck mixture screw to lean best idle again. If all is still best and smoothest idle then confirm and note the final settings.
9 To confirm settings with the engine running start by screwing in the mixture screw and count the number of turns it takes to bottom out and note if the engine dies. If Idle Mixture screws are within ½ turn of base line setting then all is well and have fun. Also check the speed screw and note how many total turns from initial contact. You may have opened (turned in) the speed screw. Your final setting should be under 2 full turns. Reset the screws (back in) to the best final settings (per your notes) and go on a test drive and have fun. If the settings are other than described then you may want to recalibrate the idle circuit (low speed circuit) to your engines needs. This is done by following the rule of thumb below.
Simple Rules for low speed calibration
If the mixture screw is more than 2 turns out then the idle jet (33) is too lean (too small). When the mixture screw is less than 11/2 then the Idle jet is too rich (too large). These assumptions are based on the fact that the speed screw setting is not opened more than 11/2 turns. If the speed screw has to be opened 2 or more turns then this is also an indication of a lean condition usually requiring greater change. At times it may appear to be showing signs of richness or flooding it is really a lean condition.
Als de afstelling niets verandert, dan een andere stationairsproeier proberen...hij bokt aanvankelijk te veel
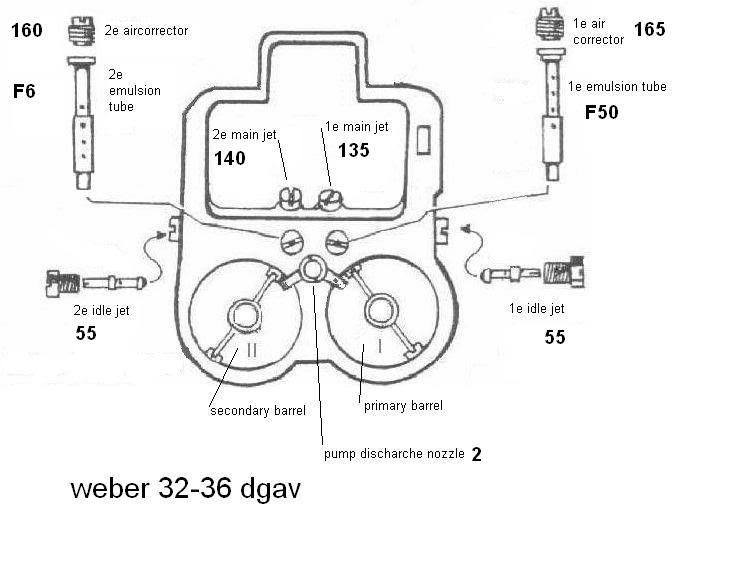
Mooooi... Misschien alles eens naar de 'Handeidingen' verhuizen?v4 hans schreef:Voor de kenners en adviseurs hierbij mijn Weber 'jet chart'.
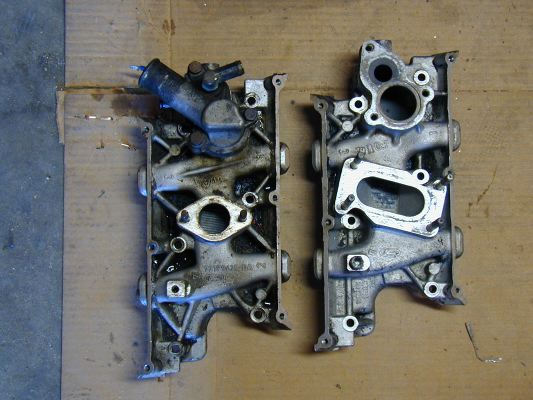
Eén verschil in uitvoering is in ieder geval dat alleen de rechterkant (naar de primaire venturi) open is, naar de linkerkant niet. Is ook wel logisch, het is van de acceleratiepomp en die gebruik je eigenlijk alleen als die eerste trap open is....Ik weet nog niet wat voor effect de 'pump discharche nozzle' nu eigenlijk heeft. In mijn verkregen weber zat een '2' en die zit er nog in. In de Weber van AB zit daar een '50'.
72sonett3 schreef: Eén verschil in uitvoering is in ieder geval dat alleen de rechterkant (naar de primaire venturi) open is, naar de linkerkant niet. Is ook wel logisch, het is van de acceleratiepomp en die gebruik je eigenlijk alleen als die eerste trap open is.
Er zitten ook nog uitwisselbare Auxiliary Venturis (98 ) in met andere maten, een 4,5 of 3,5 (diameter in mm misschien?).
De primaire gasklep die eerder open gaat dan de secundaire. Ik heb overigens een reserve DGAV liggen die ook een dubbele acceleratiepompsproeier heeft. Uit mijn hoofd gezegd ligt het aanzuiggat voor het stationair- en deellastcircuit net boven de gasklep, dus het mengsel dat in de tweede trap gespoten wordt zou dan toch via die weg richting cylinders moeten gaan.wat is dit ? wat is hier open?
Dan zou ik maar gauw gaan kijken; als er een verkeerd om gemonteerd zit (en dat kan) komt er geen mengsel uitdie heb ik in het plaatje weggelaten. Ik heb ze er niet uitgehad en dan ook geen idee wat daar eigenlijk zit of hoort te zitten.
Het pijpje waar benzine van de acceleratiepomp uit spuit, in de primaire venturi (rechts).v4 hans schreef: wat is dit ? wat is hier open?